WooCommerce Checkout Page Customization

WooCommerce Checkout Page Customization for Better Conversion and User Experience
The checkout page is a critical stage in the e-commerce customer journey. It’s the final step before a potential customer becomes a paying one. A smooth, efficient checkout process can lead to increased conversions and customer satisfaction, while a clunky, confusing one can result in abandoned carts and lost revenue.
In this blog post, we’ll dive into how to customize your WooCommerce checkout page to optimize it for better conversion and user experience.
Why Optimize Your WooCommerce Checkout Page?
- Reduce Cart Abandonment: A lengthy or complicated checkout process is a primary reason for cart abandonment. Simplifying the process can significantly decrease this rate.
- Increase Conversion Rates: A streamlined checkout experience makes it easier for customers to complete their purchases, directly boosting your conversion rates.
- Enhance User Experience: A well-designed checkout page can improve the overall shopping experience, leading to happier customers and increased loyalty.
- Build Trust: A secure and professional-looking checkout page can help build trust with your customers, making them feel more comfortable entering their payment information.
- Increase Average Order Value: By strategically placing upsells or cross-sells on the checkout page, you can encourage customers to add more items to their cart, increasing your average order value.
Key Elements of an Optimized Checkout Page
Before we dive into specific customization techniques, let’s outline the key elements of a high-converting checkout page:
- Simplicity: The page should be clean, uncluttered, and easy to navigate.
- Clarity: Instructions and form fields should be clear and concise.
- Security: Customers need to feel confident that their information is safe.
- Speed: The page should load quickly to avoid frustration.
- Mobile-Friendliness: A large number of online shoppers use mobile devices, so your checkout page must be fully responsive.
- Trust: Display trust signals like security badges, guarantees, and social proof.
How to Customize Your WooCommerce Checkout Page
Here are several effective ways to customize your WooCommerce checkout page:
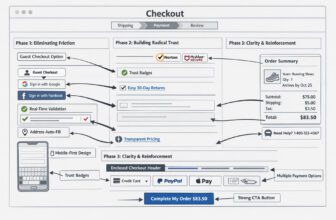
1. Simplify the Checkout Process
- Reduce the Number of Fields: The default WooCommerce checkout page often includes many fields that may not be necessary. Remove any unnecessary fields to make the process quicker and easier for customers.Code Example: Here’s how to remove the “Company Name” field using PHP:
add_filter( 'woocommerce_checkout_fields' , 'custom_override_checkout_fields' ); function custom_override_checkout_fields( $fields ) { unset($fields['billing']['billing_company']); return $fields; } - Enable Guest Checkout: Forcing customers to create an account before they can make a purchase can deter many of them. Offering a guest checkout option allows customers to complete their purchase without creating an account, reducing friction. (This is a WooCommerce setting, not code).
- Use a Multi-Step Checkout: Instead of displaying all the checkout fields on a single page, break them down into logical steps (e.g., Billing Details, Shipping Details, Order Review, Payment). This can make the process seem less overwhelming and more manageable for customers.
- Progress Indicator: If you use a multi-step checkout, include a progress indicator to show customers where they are in the process and how many steps are left. This helps manage expectations and reduces anxiety.
2. Optimize Form Fields
- Clear Labels and Instructions: Ensure that all form fields have clear labels and instructions. Use placeholder text within the fields to provide additional guidance.
- Auto-Fill and Auto-Complete: Implement address auto-fill or auto-complete functionality to speed up the process and reduce errors. This can be achieved using plugins or APIs like the Google Places API.
- Smart Field Validation: Use JavaScript to validate form fields in real-time. This can help customers catch errors before they submit the form, reducing frustration and preventing incomplete orders.Code Example: Here’s a basic example of using JavaScript to validate an email field:
<script> document.getElementById('billing_email').addEventListener('blur', function() { const email = this.value; const emailRegex = /^[\w-\.]+@([\w-]+\.)+[\w-]{2,4}$/; if (!emailRegex.test(email)) { alert('Please enter a valid email address.'); this.value = ''; // Clear the invalid input } }); </script> - Prioritize Important Fields: Place the most important fields (e.g., email address, shipping address) at the top of the form to ensure they are easily visible.
3. Improve the Design and User Experience
- Clean and Minimalist Design: Use a clean and minimalist design to reduce distractions and keep the focus on completing the purchase. Use plenty of white space and avoid clutter.
- Mobile Optimization: Ensure your checkout page is fully responsive and works seamlessly on all devices, including smartphones and tablets. Use a single-column layout for mobile users to make it easier to scroll and fill out forms.
- Branding: Customize the look and feel of your checkout page to match your brand. Use your brand colors, fonts, and logo to create a consistent and professional experience.
- Clear Call to Action: Use a clear and prominent call-to-action button (e.g., “Place Order,” “Complete Purchase”) to make it obvious what the customer needs to do to complete their purchase.
- Order Summary: Display a clear and concise order summary on the checkout page, including the items in the cart, quantities, prices, and the total amount. Allow customers to easily edit their cart from the checkout page if necessary.
4. Enhance Trust and Security
- SSL Certificate: Ensure your website has a valid SSL certificate to encrypt the data transmitted between the customer’s browser and your server. Display a security padlock icon in the address bar to reassure customers.
- Trust Badges: Display trust badges from reputable third-party providers (e.g., Norton Secured, McAfee Secure) to show customers that your site is secure and their information is safe.
- Privacy Policy and Terms of Service: Provide clear links to your privacy policy and terms of service on the checkout page. This shows customers that you are transparent about how you handle their data and what the terms of the transaction are.
- Customer Testimonials and Reviews: Consider adding customer testimonials or reviews to the checkout page to provide social proof and build trust.
5. Optimize Payment Options
- Multiple Payment Options: Offer a variety of payment options to cater to different customer preferences. In addition to credit cards, consider offering PayPal, Apple Pay, Google Pay, and other popular payment methods.
- Clear Payment Information: Provide clear and concise information about the available payment options, including any fees or restrictions.
- Secure Payment Processing: Use a reputable payment gateway to process payments securely. Ensure that your payment gateway is PCI DSS compliant.
6. Post-Checkout Optimization
- Order Confirmation: Display a clear and informative order confirmation page after the customer completes their purchase. Include the order details, shipping information, and estimated delivery date.
- Thank You Page: Customize your thank you page to express gratitude to the customer and provide additional information, such as links to your social media profiles or related products.
- Follow-Up Emails: Send automated follow-up emails to confirm the order, provide shipping updates, and request feedback.
Tools and Plugins for WooCommerce Checkout Customization
Several plugins and tools can help you customize your WooCommerce checkout page:
- WooCommerce Checkout Field Editor: This plugin allows you to easily add, edit, or remove fields from the default WooCommerce checkout page.
- CheckoutWC: This plugin replaces the default WooCommerce checkout page with a conversion-optimized design.
- FunnelKit (formerly WooFunnels): This plugin provides tools to create custom checkout flows and optimize the checkout process.
- Gutenberg and Page Builders: If you’re using a theme that supports it, you can use the WordPress block editor (Gutenberg) or a page builder plugin like Elementor or Beaver Builder to customize the layout and design of your checkout page.
Best Practices for WooCommerce Checkout Optimization
- Regularly Test Your Checkout Process: Test your checkout process regularly to identify any potential issues or areas for improvement.
- Monitor Your Metrics: Keep an eye on key metrics such as cart abandonment rate, conversion rate, and average order value to track the effectiveness of your optimizations.
- Gather Customer Feedback: Ask your customers for feedback on their checkout experience to identify areas where you can make improvements.
- Stay Up-to-Date: Keep up with the latest e-commerce trends and best practices to ensure your checkout page is always optimized for success.
By implementing these strategies, you can create a WooCommerce checkout page that is optimized for conversion, user experience, and success. Check our beautiful blog post on Complete WooCommerce Customization here.


I’m Manas Ranjan Sahoo: Developer/Founder of “Webtirety Software”. I’m a Full-time Software Professional and committed to expanding Webtirety Software into a thriving platform that empowers businesses and individuals alike. I love to Write Blogs on Software, Technology, eCommerce, SEO, and Digital Marketing.