DIY Delicate Silver Bee Pendant | Polymer Clay Jewelry
You are here: Home / Create and Decorate / DIY Delicate Silver Bee Pendant | Polymer Clay Jewelry
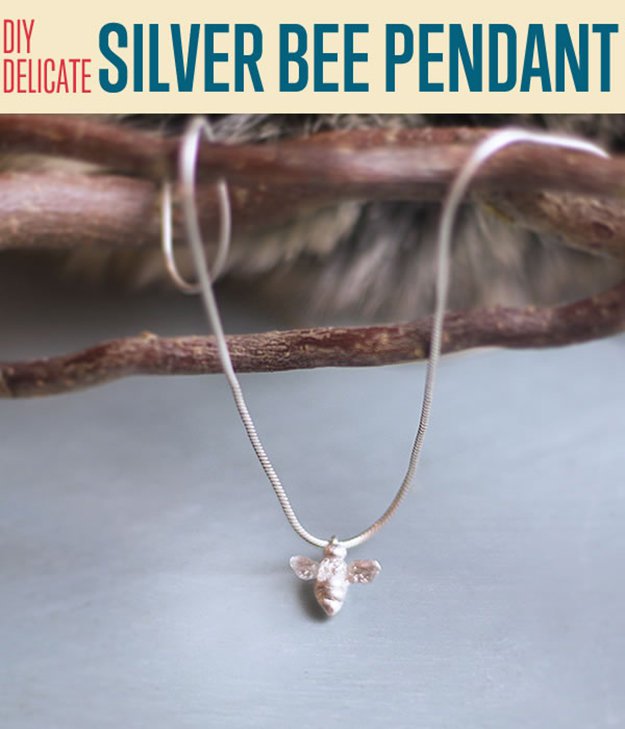
Delightfully tiny and sweet, this delicate bee pendant is a one-hour project that you can do with very little sculpting expertise. Perfect with any outfit, this little pendant will look fabulous any time of the year!
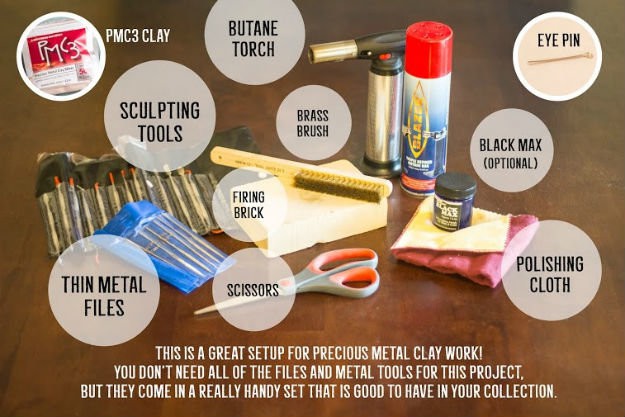
You’ll need to have a basic Precious Metal Clay setup to do the metal parts of this project.
For all PMC-related supplies, I outfitted at riogrande.com, metalclaysupply.com, and Amazon.com.
Supplies:
- PMC Clay (I’d recommend PMC3 for this project)
- Necklace Chain (not pictured)
- Jewelry eye pin (Michael’s or a Bead Store)
- Metal glue (not pictured – Michael’s/Hardware Store)
PMC Tool Recommendations:
- Butane Torch
- Butane Refill
- Black Max (optional – for oxidizing the silver and giving it that wonderful “aged” look)
- Polishing Cloth
- Brass Burnishing Brush
- Firing Brick
- Sculpting Tools (optional). You could probably get away with using a toothpick and a kitchen knife for this project, but I thought I’d show you what a little set of sculpting tools can look like (the ones in the black roll out). They aren’t that expensive, and I’ve never regretted getting mine. If you search “wax carvers” on Amazon.com, you can get that whole stainless steel set for $8.99!
- Thin metal files (you only need one, but they generally come in a nice set like this)
Other Items from Around the House + Craft Room:
- Scissors
- Paper Towels
- Scrap Paper
- Tweezers
Step 1
Start with 3 balls of PMC3 clay (little tiny balls!) Make them graduated in size so that you have a “small”, “medium”, and “large”. Roll the largest ball into a teardrop shape (as pictured). That will be the bee’s bum.
Step 2
Now take your little teardrop-shaped piece of PMC3 clay and texturize it: using one of your fine-tipped sculpting tools (or a toothpick/butterknife if you don’t have sculpting tools), press lines around the width of the teardrop.
Step 3
Now take your “medium” ball of PMC3 clay and attach it to the teardrop bee-bum. This will serve as the little torso of the bee. Use some tap water (just a drop, dabbed on) to wet the areas that will be joined, so that they become sticky and grab onto each other. PMC clay dries up so quickly when you work with it, so it will almost definitely be necessary for you to wet the two little pieces to bond them together. It also helps to slightly rough up the area where the two pieces touch, to promote a tight bond. After the torso is attached, give it a handful of pokes with a needle to create an interesting texture. Later, after firing, that will help give the bee a “fuzzy torso” look, like a cute bumble bee.
Step 4
This step is just like the previous, only now you are attaching the smallest clay ball (the head) onto the torso.
Step 5
The wings are delicate to attach, but easy to make. Simply roll up two teeny tiny balls of clay, squish them flat, and shape them into teardrops. Then wet the base of each wing and press it into the side of your bee.
Step 6
Let your tiny little micro sculpture dry. If you are air-drying, I’d recommend waiting 24 hours. I’m impatient, so I always use a candle warmer to really speed up that drying process! Mine dried on the candle warmer for two hours and then it was ready to fire (because it is so small).
Step 7
Once your metal clay piece is dry, it’s time to fire it! If you want a visual demonstration of torch-firing PMC, YouTube is a great resource. I’ll give you a bulleted breakdown here if you just need the basic steps:
- Place your bone-dry PMC pieces onto your firing brick. Make sure your brick is on a non-flammable surface.
- Turn on your butane torch and start sweeping the end of the flame around your PMC piece in a continuous motion. Don’t hold the flame on any one part for too long. Hold the flame at an angle (don’t aim straight down).
- Your piece will burst into flames and then extinguish on its own in a few seconds – that’s good! That’s where the sintering really begins to happen. The bonding elements between the silver particles are burning away, and fusing the metal. Firing metal clay will always result in some shrinkage – that’s completely normal!
- Keep working the flame around your piece until it starts to glow a lovely peach color. Doing the torch firing in a dark room really helps you see the stages of the firing process. Once the peach glow appears, keep firing for a few minutes more (I like to do about 2-3 minutes more).
- After firing, your pieces will still be white, but that’s actually just a layer of dust at this point. Don’t worry – there is fine silver underneath!
- Turn your torch off and let the pieces cool. Really cool. I have burned my fingers pretty good in the past thinking, “Eh, they’re probably cool by now”.
Step 8
This step is the most fun, and I absolutely love it! Using your brass burnishing brush, firmly brush across the surface of your pieces in one direction. You’ll see the dusty white layer disappear and beautiful, rich silver will emerge underneath.
Step 9
Give your piece a (very) gentle rub with a polishing cloth to clean and shine it. Now that the pendant is done, it’s time to attach it to the necklace.
Take your little silver eye pin and use a wire cutter to snip the tail down to a length that is about ¾ the length of your little bee.
Using jewelry pliers, open the head of the eye pin slightly, slide a necklace chain into the head, and pinch it back into its closed circle. The eye pin has such a tiny opening that no necklace chain will fit through it from the side.
Using a dot of metal glue (or super-strength general purpose adhesive), glue the little eye pin onto the back of your bee pendant and let it dry for the time indicated on the glue bottle.
You’re done! Wear and enjoy your classy, petite little bumble bee.
A Note About Making The Silver Look Old:
For many projects, I like an old, weathered silver look, but for this bee I think it looks lovely as a white-silver. If you do want a weather, tarnished, rich look to your piece, purchase a container of Black Max (pictured with the supplies). There are many great YouTube videos on how to use it! It’s quite easy, and gives your piece a fantastically aged look.
And that’s how you do it crafters! Did you enjoy our easy tutorial on how to make a pendant? Let us know in the comments section below what your thoughts are on this DIY jewelry. Do you have any other jewelry making ideas you’d like to share? Share it with us and we’ll give it a try. We love doing cool DIY projects by making craft projects, home decor projects, upcycling ideas, recipes, tutorials and anything you can do yourself. That’s why we created this site, we want people to be more in touch with their creative side and realize that there’s a lot of things that they can do themselves. We’d love to hear from you and create a community of DIY enthusiasts where any project is just a click away. Stay connected with us on Facebook,Twitter, Pinterest and Instagram!
We have more easy DIY necklaces you’ll absolutely love! See more tutorials below:
How to Make a Leather Necklace | DIY Necklace
Fabric Necklace | How to Make a Necklace
Leather-Feather Metallic Statement Necklace
I’m Manas Ranjan Sahoo: Founder of “Webtirety Software”. I’m a Full-time Software Professional and an aspiring entrepreneur, dedicated to growing this platform as large as possible. I love to Write Blogs on Software, Mobile applications, Web Technology, eCommerce, SEO, and about My experience with Life.


